
Blood Pressure: How to Measure It Correctly at Home
On This Page
- One reading doesn’t tell the whole story
- Why home readings matter
- Step 1: Choose the right monitor
- Step 2: Prepare before you measure
- Step 3: Take the reading
- Step 4: Measure at the right times
- Common mistakes (and easy fixes)
- What your numbers mean
- Your numbers need someone to read them
- Quick checklist
- Sources
Blood Pressure: How to Measure It Correctly at Home
One reading doesn’t tell the whole story
You sit down at a pharmacy kiosk, slip your arm into the cuff, and the screen flashes a number higher than you expected. Or a nurse at urgent care mentions your blood pressure is “a little up” on your way out the door. Then nothing happens. No follow-up, no plan, just a number you’re not sure what to do with.
Here’s the thing: a single blood pressure reading is a snapshot. It can be thrown off by the coffee you had an hour ago, the stairs you just climbed, or simply being nervous in a medical setting. That’s why doctors increasingly ask patients to check their blood pressure at home.
Home readings are only useful if they’re taken correctly, though. Small, common mistakes can push a reading up or down enough to change how it’s interpreted. This guide walks you through how to do it right, step by step.
Why home readings matter
High blood pressure affects nearly half of U.S. adults (46.7%), and many of them don’t know it. It usually causes no symptoms, so the only way to find it is to measure.
Office readings alone can mislead in two directions:
- White-coat hypertension. Your blood pressure runs high at the doctor’s office but normal at home. Treating based on office numbers alone could mean medication you don’t need.
- Masked hypertension. Your blood pressure looks fine at the office but runs high the rest of the day. This one is easy to miss, and it carries real risk.
Home readings help sort this out. The 2025 high blood pressure guideline from the American Heart Association and American College of Cardiology recommends home monitoring to help confirm a diagnosis and to track whether treatment is working.
The kidney connection
Dr. Jebelev is fellowship-trained in nephrology, the study of the kidneys, so blood pressure is a number she pays close attention to. Your kidneys filter blood through millions of tiny vessels. Years of high pressure can damage those vessels quietly, and kidney disease, in turn, can push blood pressure higher. Catching high blood pressure early protects your heart, your brain and your kidneys.
One important note: home readings add to your care. They don’t replace visits with your doctor, and you should never stop or change a blood pressure medication based on home numbers without talking to your doctor first.
Step 1: Choose the right monitor
Accurate readings start with the right device. Here’s what to look for:
- An automatic upper-arm cuff. This is the type the American Heart Association recommends. Wrist and finger monitors give less reliable readings.
- Skip the smartwatch for now. Cuffless devices, like watches and rings that estimate blood pressure, aren’t recommended yet because their accuracy isn’t reliable enough.
- A validated device. “Validated” means the monitor was tested against medical-grade equipment. You can look up devices by brand and price at validatebp.org, or ask your pharmacist.
- The right cuff size. This matters more than most people realize. Measure around the middle of your upper arm with a soft tape measure and match it to the cuff range on the box. A cuff that’s too small tends to read high; one that’s too large tends to read low.
Then bring it in. Take your new monitor to your next appointment. Your doctor can check your technique and compare your device’s readings with the office equipment. It’s a good idea to recheck it about once a year.
If you have an irregular heartbeat (such as atrial fibrillation), home monitors may not read accurately. Ask your doctor before relying on home numbers.
Step 2: Prepare before you measure
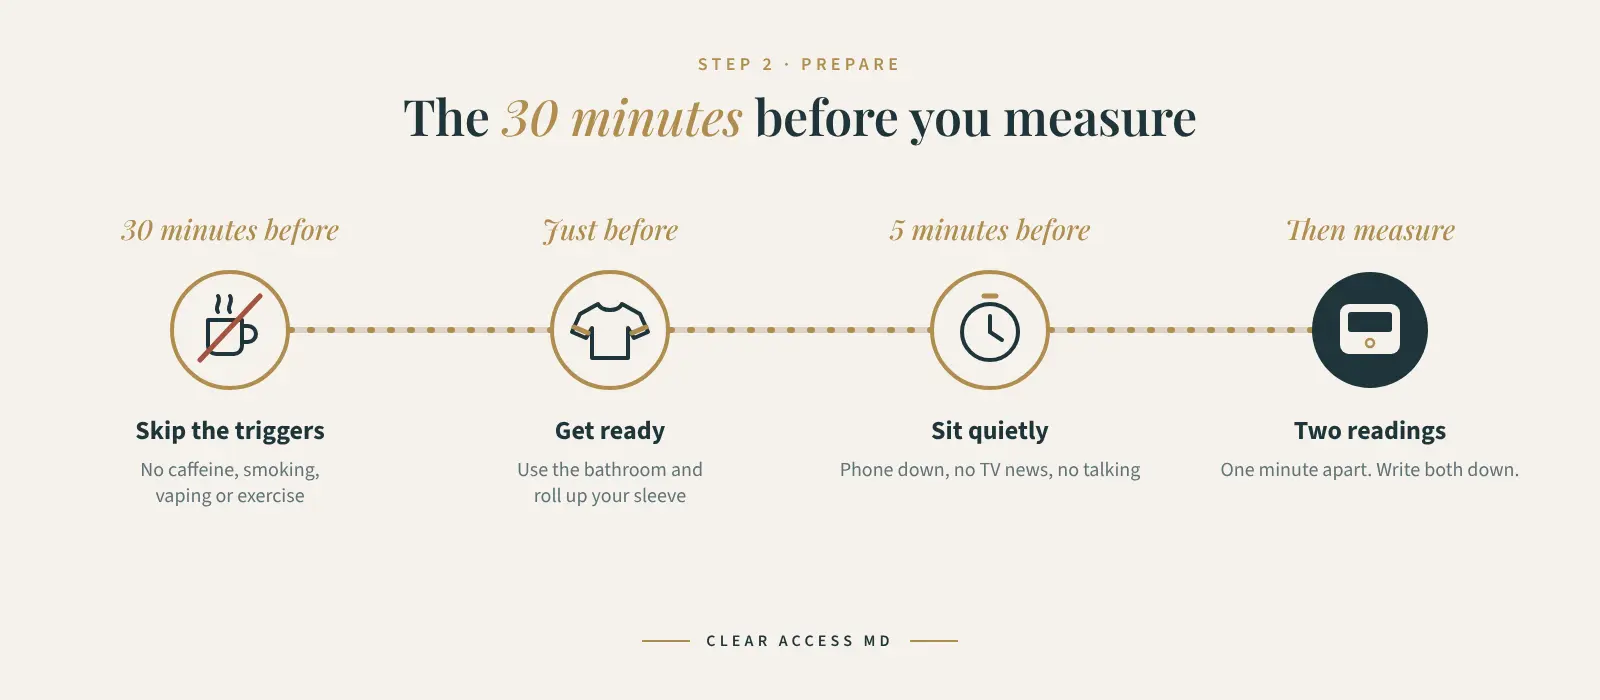
What you do in the half hour before a reading matters as much as the reading itself.
In the 30 minutes before:
- No coffee, tea, energy drinks or other caffeine
- No smoking or vaping
- No exercise
Right before:
- Use the bathroom. A full bladder can raise your reading.
- Roll up or remove your sleeve. The cuff goes on bare skin, never over clothing.
- Sit quietly for at least 5 minutes. Put the phone down, turn off the TV news, and don’t talk.
Step 3: Take the reading
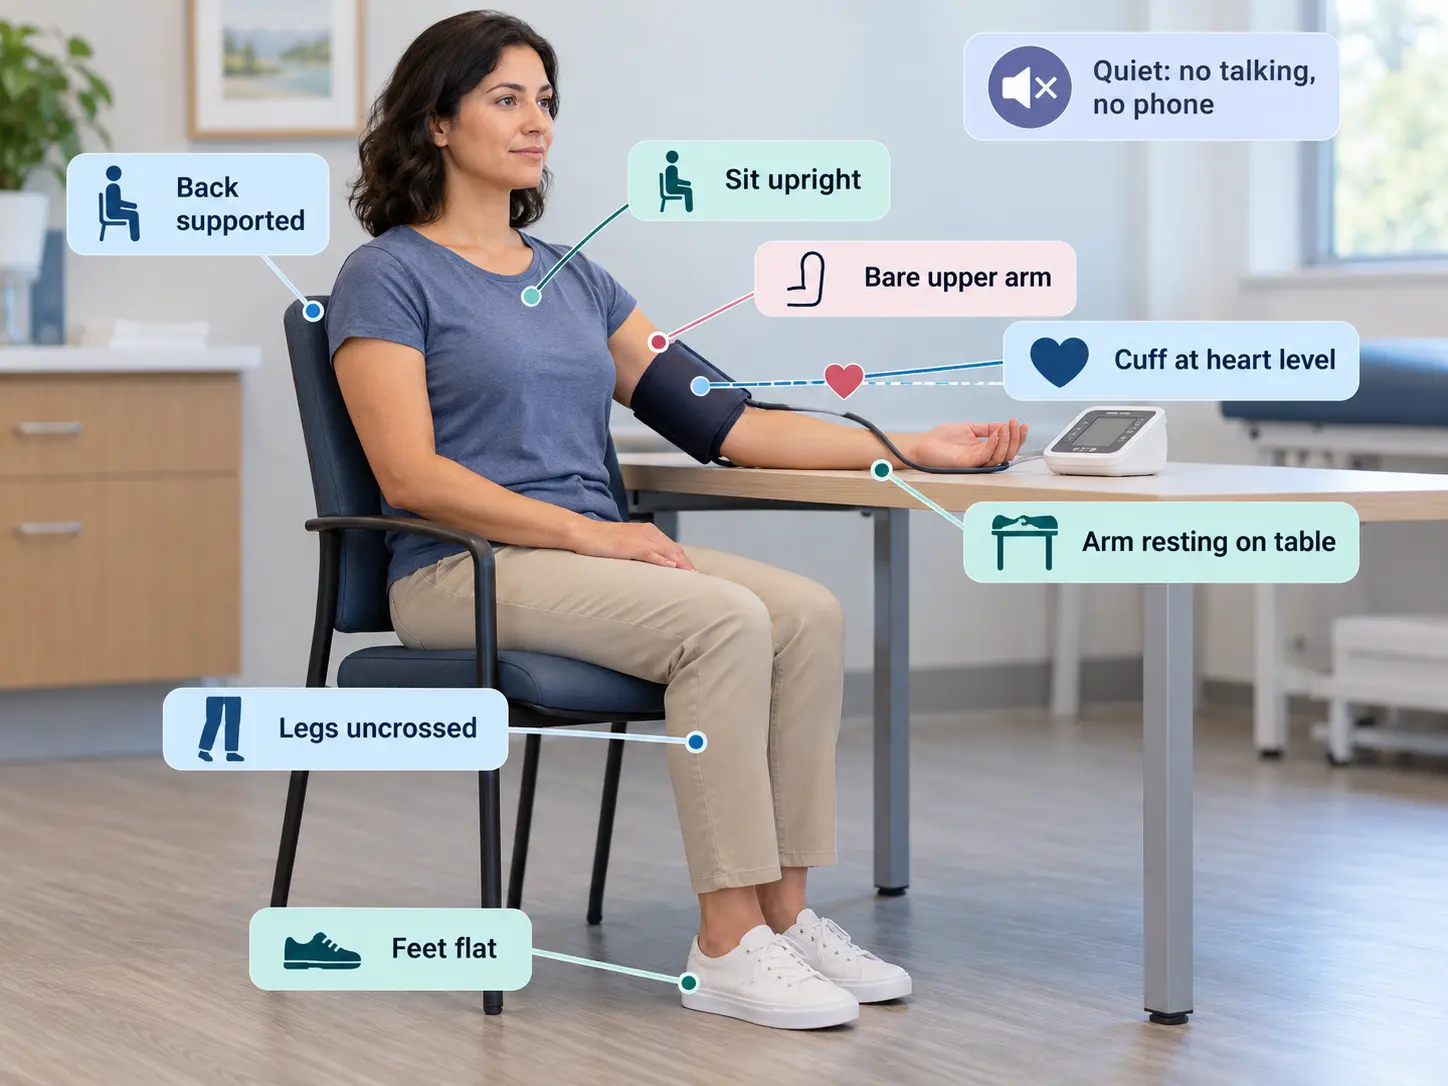
- Sit in a straight-backed chair. A dining chair works better than a sofa. Your back should be supported.
- Plant your feet. Both feet flat on the floor, legs uncrossed.
- Support your arm at heart level. Rest it on a table so the middle of the cuff sits level with your heart. Don’t let your arm hang down or hold it up yourself.
- Position the cuff. Wrap it snugly around your bare upper arm, with the bottom edge just above the bend of your elbow. Check your monitor’s instructions for the exact placement.
- Stay still and quiet. Don’t talk or move while the cuff inflates.
- Take a second reading. Wait about one minute, then measure again.
- Write both numbers down. Record the date, time and both readings, even if one looks odd.
Either arm is fine. Readings usually don’t differ much between arms. Whichever you pick, use the same arm each time so your numbers are comparable.
Step 4: Measure at the right times
Consistency is what turns individual readings into a useful picture. Measure at the same times each day.
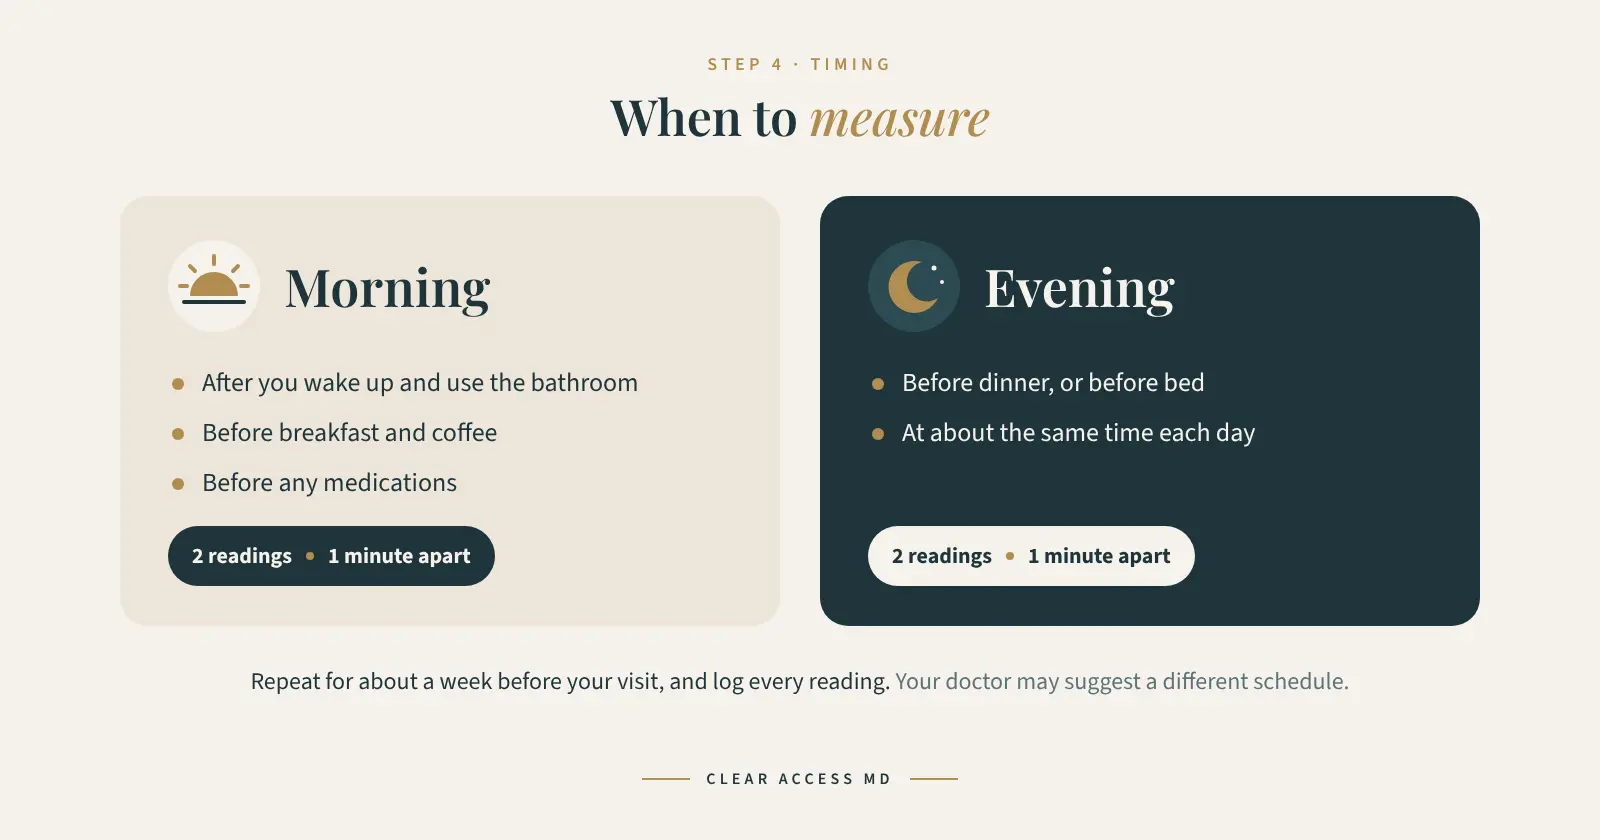
Each session means two readings, one minute apart. Your doctor will tell you how often to check, but a common approach is to measure morning and evening for about a week before a visit. If you’re checking whether your blood pressure is truly high, one to two weeks of home numbers usually gives a clear answer.
Keep a log. Paper, a phone app or your monitor’s built-in memory all work. What matters is that you record every reading, not just the good ones, and bring the log to your appointment.
Common mistakes (and easy fixes)
Most inaccurate home readings come down to a handful of habits.
| Mistake | Fix |
|---|---|
| Measuring right after coffee, a cigarette or a walk | Wait 30 minutes |
| Sitting down and measuring right away | Rest quietly for 5 minutes first |
| Talking, scrolling or watching TV during the reading | Stay silent and still |
| Cuff over a sleeve | Cuff on bare skin |
| Wrong cuff size | Measure your arm and match the cuff |
| Arm hanging at your side or resting in your lap | Support it on a table at heart level |
| Slouching on a couch or crossing your legs | Upright chair, back supported, feet flat |
| Full bladder | Use the bathroom first |
| Only writing down the “good” numbers | Record every reading |
| Using a wrist cuff or smartwatch | Use a validated upper-arm cuff |
What your numbers mean
A reading has two numbers. The top number (systolic) is the pressure when your heart beats. The bottom number (diastolic) is the pressure between beats. These are the categories used by the American Heart Association, unchanged in the 2025 guideline:
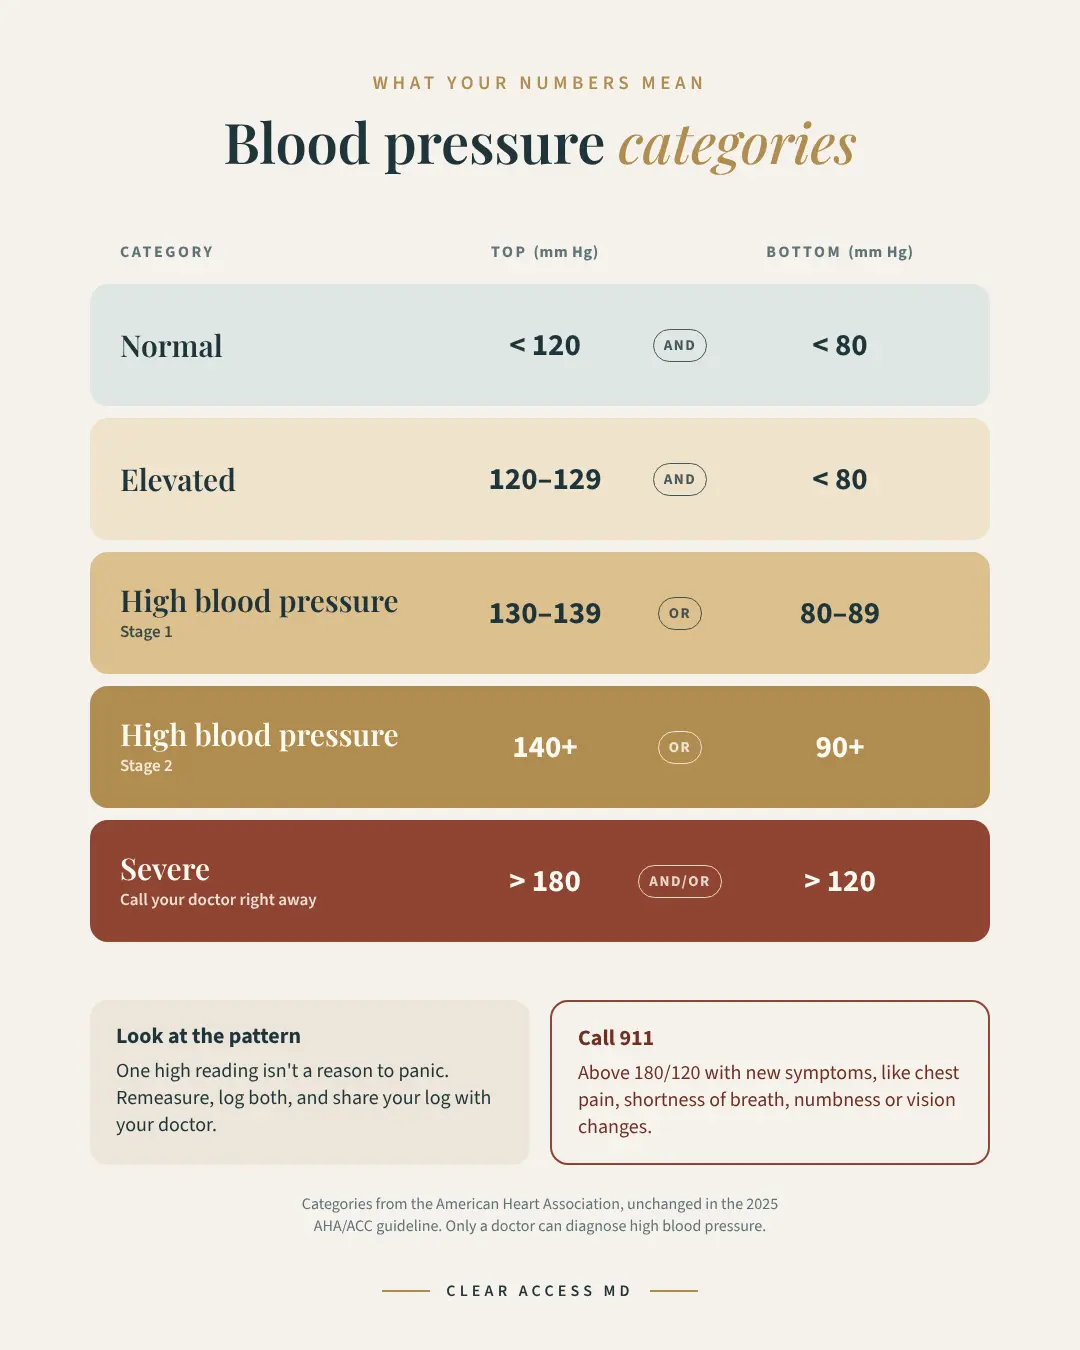
Look at the pattern, not a single reading. One high number isn’t a reason to panic. Remeasure, write both down, and share your log with your doctor. Only a doctor can diagnose high blood pressure.
When to get help right away
If a reading is suddenly higher than 180/120, wait at least a minute and measure again. If it’s still that high, contact your doctor immediately.
Call 911 if your blood pressure is higher than 180/120 and you have new symptoms, such as:
- Chest pain or back pain
- Shortness of breath
- Numbness or weakness
- Changes in vision or difficulty speaking
- Confusion, dizziness or vomiting
Your numbers need someone to read them
A week of careful readings is valuable, but only if a doctor actually looks at them, asks questions, and helps you decide what comes next. That might be a few lifestyle changes, more monitoring, or treatment. Too often, home logs end up in a drawer because there’s no one to bring them to, or the next available appointment is weeks away.
That’s the gap a primary care doctor fills. At Clear Access MD, Dr. Jebelev spends real time with each patient and stays reachable between visits. You can send her your readings and get an answer, not a voicemail. With her background in kidney medicine, blood pressure is something she knows well.
A good place to start:
- Bring your cuff and your log to a visit. We’ll check your technique, compare your monitor with ours, and walk through what your numbers mean.
- Book a free 30-minute intro visit in person, by phone or by video to see if the practice is a fit.
- Get a baseline with our $179 annual physical, which includes a full lab panel.
Visits are available in English and Spanish, for adults across Lakewood Ranch, Bradenton and Sarasota.
Quick checklist
Save this for every reading:
- No caffeine, smoking or exercise for 30 minutes
- Bladder empty
- Sitting upright, back supported, feet flat, legs uncrossed
- Cuff on bare upper arm, arm supported at heart level
- Rested quietly for 5 minutes
- No talking during the reading
- Two readings, one minute apart
- Both numbers written down
Get the free printable 7-day log
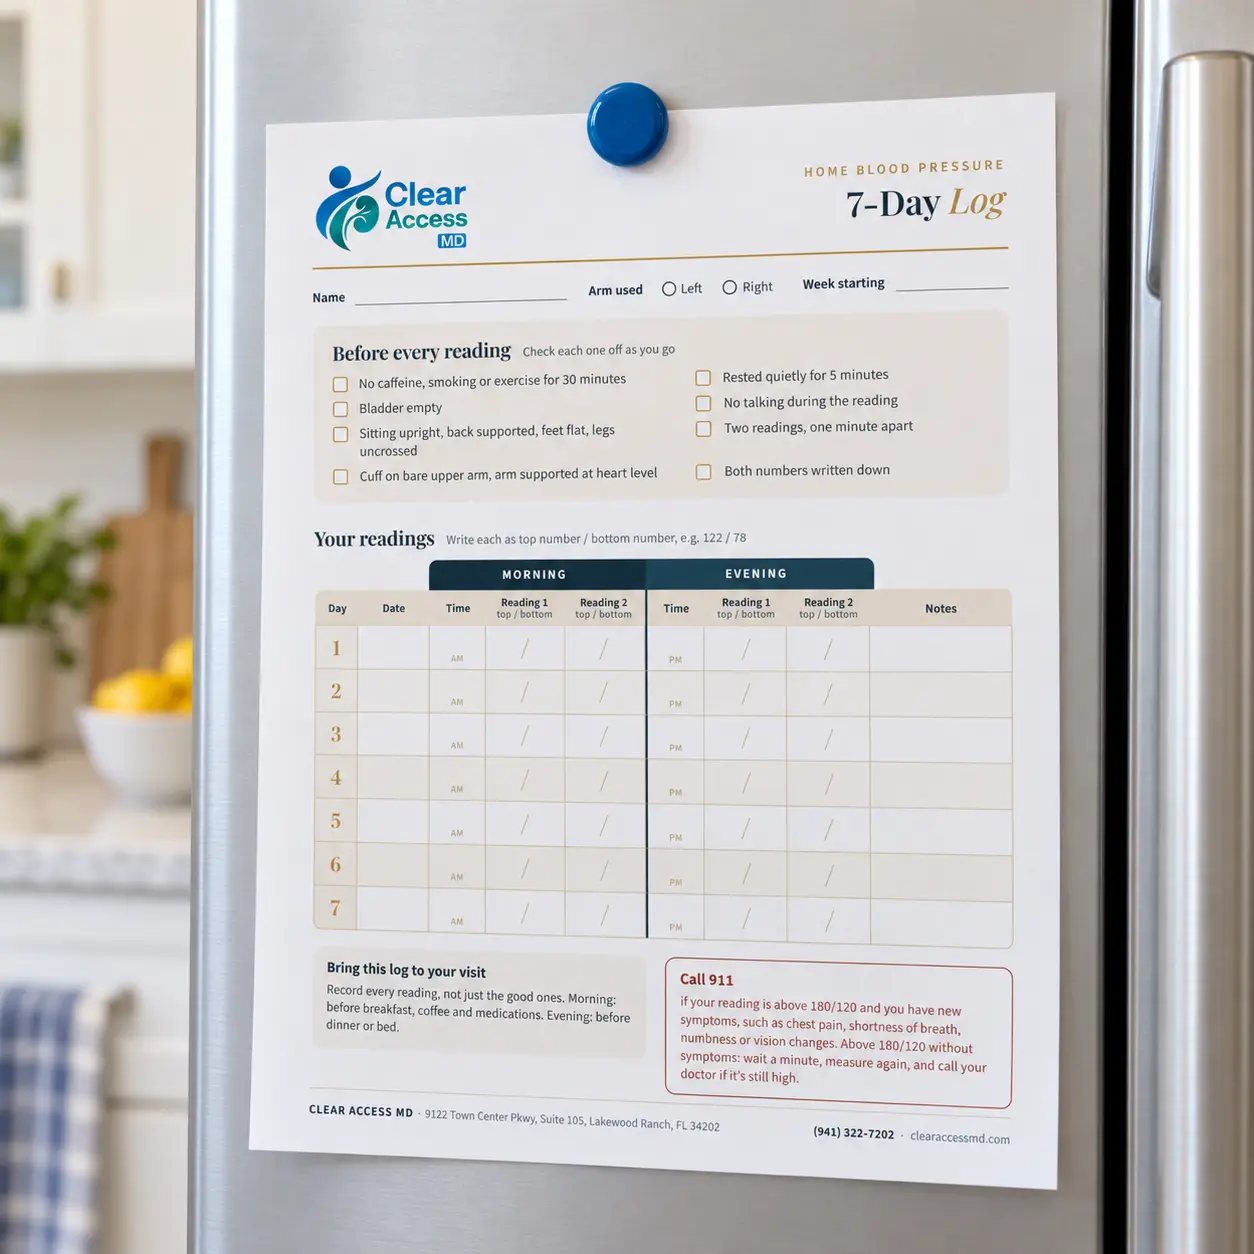
A log is easier to keep when it’s on paper, right next to your cuff. Our free printable fits a full week of readings on one page, so you can bring it to your next appointment.
Inside the log:
- The “before every reading” checklist, with boxes to tick
- Space for two morning and two evening readings each day, plus the time
- A notes column for anything that might affect a reading, like a poor night’s sleep or a missed dose
- When to call your doctor and when to call 911
Enter your email and we’ll send it right over.
Sources
- American Heart Association, Monitoring Your Blood Pressure at Home: device choice, preparation, technique, categories, 180/120 guidance
- 2025 AHA/ACC high blood pressure guideline announcement (EurekAlert): 46.7% prevalence, unchanged categories
- New 2025 guidelines focus on early intervention (News-Medical): home monitoring to confirm diagnosis and track treatment
- 2025 guideline summary: cuffless devices not yet recommended
- Are At-Home Blood Pressure Monitors Accurate? (Hippo Education): validatebp.org, 1–2 weeks of home readings
- validatebp.org: validated device list